
How to Level Up Your Washer and Dryer Like a Pro: Easy Guide to Using Leveling Screws
That annoying shake, rattle, and roll coming from your laundry room? Yeah, it is not supposed to be part of the spin cycle soundtrack. If your washer sounds like it is trying to break free and dance across the floor, or your dryer is vibrating the whole house, you have got a leveling problem on your hands. The good news? This is totally fixable with a little know-how and about 30 minutes of your time.
Whether you are a first-time homeowner in Columbus or have been dealing with wonky appliances for way too long, leveling your washer and dryer is one of those adulting skills that pays off big time. Not only will you finally get some peace and quiet during laundry day, but you will also extend the life of your appliances and prevent costly repairs down the road.
Why Proper Leveling Actually Matters
Before we dive into the how-to, let us talk about why this matters so much. When your washer and dryer are not sitting level and stable, a bunch of bad stuff starts happening. The spinning action creates uneven forces that put extra stress on internal components like bearings, suspension systems, and drive belts. Over time, this leads to premature wear and expensive repairs.
Plus, an unlevel washer can actually damage your clothes. Uneven spinning means clothes get bunched up on one side, leading to poor cleaning and potential fabric damage. And do not even get me started on the noise factor - nobody wants their laundry room sounding like a construction site at 9 PM.
For folks here in Central Ohio, this is especially important because many of our homes have older foundations that might have settled unevenly over time. Even brand-new appliances can develop leveling issues if they are not set up properly from day one.
Gathering Your Level-Up Arsenal
The beauty of this project is that you probably already have most of what you need sitting in your garage or toolbox. Here is what you will want to gather before getting started:
Essential Tools:
- Adjustable wrench or channel-lock pliers (usually 9/16 inch or 14mm)
- Bubble level or smartphone level app
- Work gloves for better grip and safety
- Flashlight or headlamp for seeing under the appliances
- Wooden blocks or furniture sliders for bracing
Optional but Helpful:
- Anti-vibration pads (great for extra noise reduction)
- Small notebook to jot down which legs need adjustment
- Helper (seriously, these things are heavy)
Safety first - never attempt to move or adjust these appliances alone. Modern washers and dryers can weigh 150-300 pounds, and you definitely do not want to risk injury or damage to your floors.

The Step-by-Step Leveling Process
Getting Started: The Pre-Game Setup
Start by making sure your appliances are in their final position. Do not level them and then try to scoot them into place - you will just mess up all your hard work. If you need to move them, do it first, then level.
Take a look at your floor situation. Concrete floors in basements are usually pretty level, but wooden floors upstairs might have some variation. In older Columbus homes, it is common to find floors that are not perfectly flat, so do not panic if you need to make some bigger adjustments.
Top-Load Washers: The Classic Approach
Most top-load washers have four adjustable legs, with the front two being manually adjustable and the rear ones often being self-leveling. Start by placing your level on top of the washer, checking it from side to side and front to back.
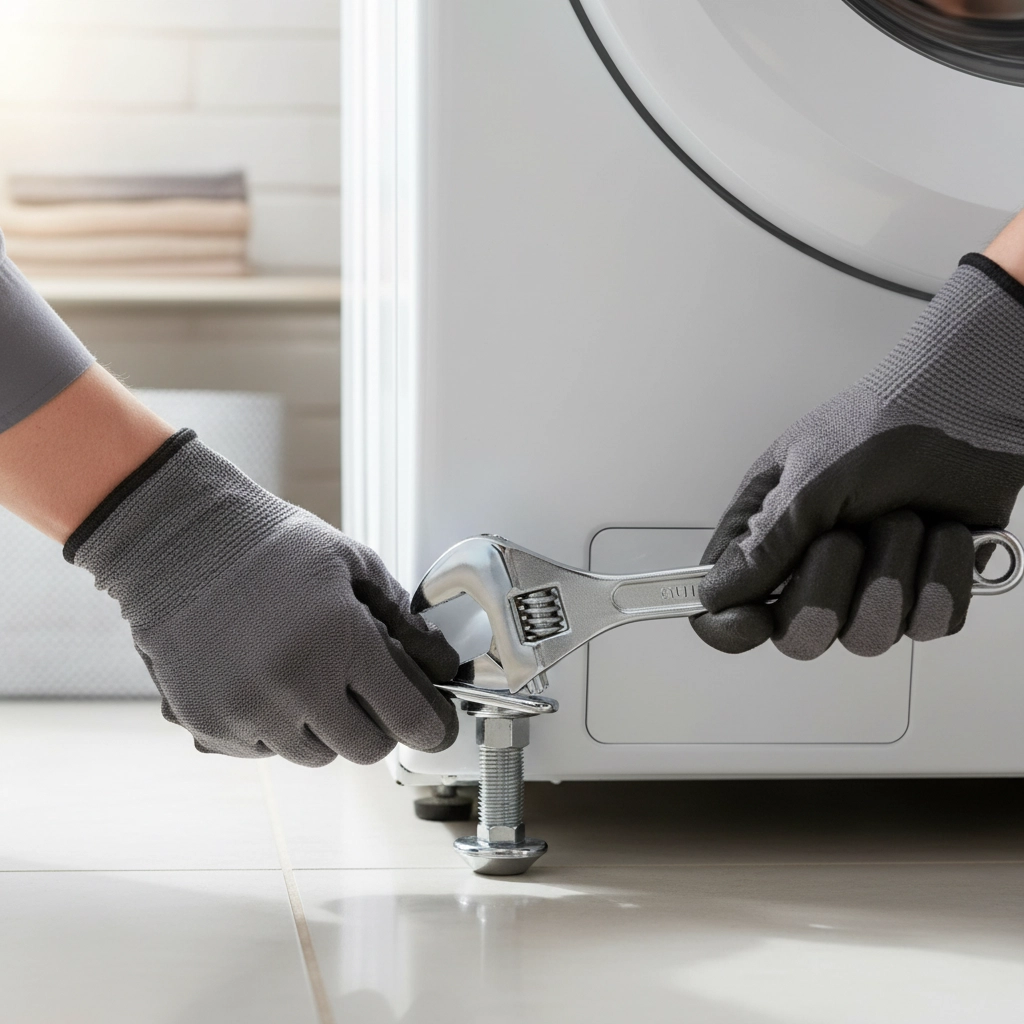
If you see the bubble off-center, it is time to make some adjustments. Have your helper gently lift the front of the washer while you slip a wooden block underneath for support. Now you can access those front leveling legs.
Turn the legs clockwise to raise that corner or counterclockwise to lower it. Make small adjustments - we are talking quarter turns at a time. Check your progress frequently with the level because it is easy to overcorrect.
For the back legs, many models are self-leveling. Just tip the washer forward slightly (with your helper, of course) and let it settle back down. The rear legs should automatically adjust to the floor level.
Front-Load Washers and Dryers: A Slightly Different Dance
Front-loaders typically have four manually adjustable feet, and the process is similar but requires a bit more finesse. These machines tend to be heavier and sit lower to the ground, so you might need to get more creative with your positioning.
Place your level on top and check both directions. When you find an unlevel spot, you will need to adjust the corresponding leg. Most front-load units have locking nuts on their leveling feet - loosen these first before making height adjustments.
The key here is to make sure all four feet are touching the ground solidly. Even if your level shows the machine is balanced, if one foot is not making contact, you will still get vibration and movement during the spin cycle.
Testing Your Work Like a Pro
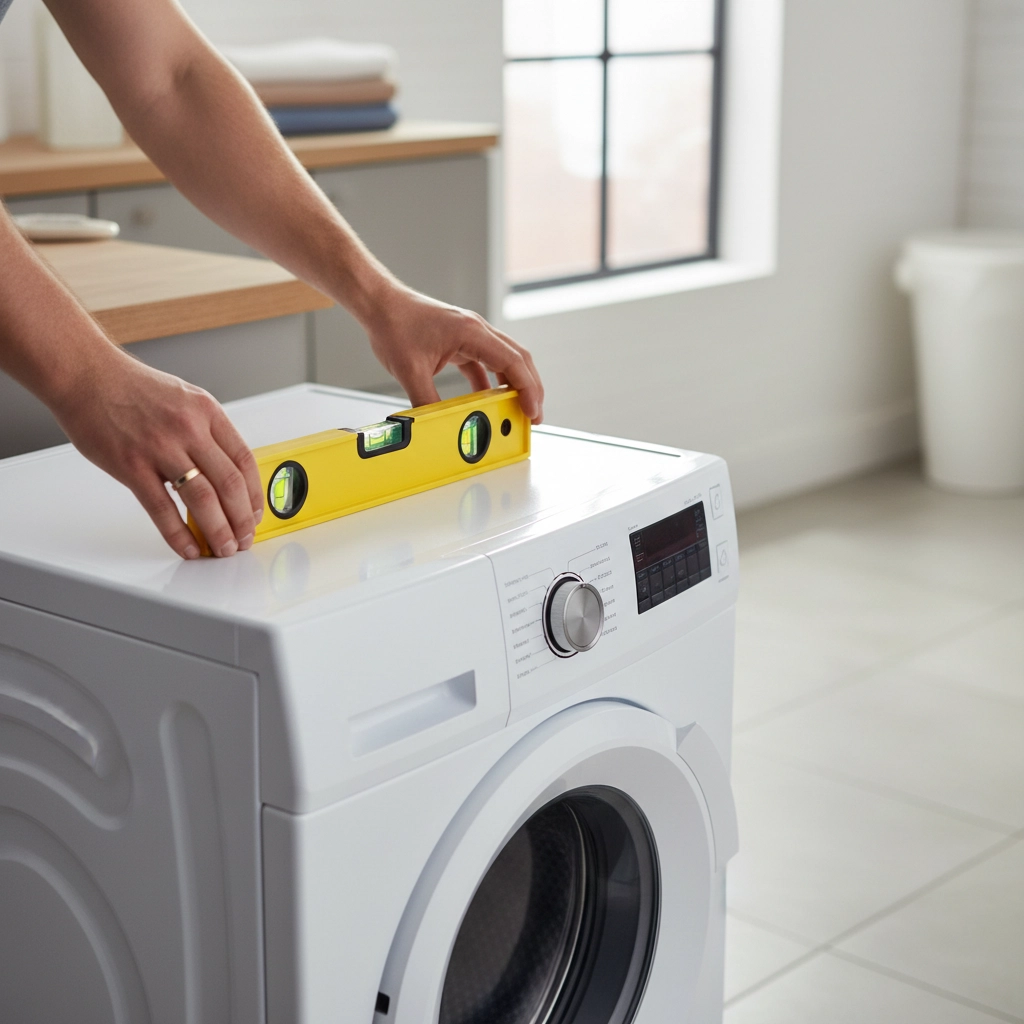
Once you think you have got everything level, it is time for the real test. Place your level on top of the appliance in multiple positions - front to back, side to side, and diagonally across the corners. The bubble should be perfectly centered in all positions.
Next, try the "rock test." Place your hands on opposite corners of the appliance and try to rock it gently. A properly leveled and stable machine should not budge at all. If you can make it rock even slightly, you need to adjust the legs until all four feet are making solid contact with the floor.
Do not forget to tighten those locking nuts if your appliance has them. These little guys are crucial for keeping your adjustments in place over time. Nothing is more frustrating than perfectly leveling your washer only to have it shift out of alignment after a few loads.
The Real-World Test Drive
Now for the moment of truth - run an actual load. Start with a small, evenly distributed load of towels or similar items. Watch and listen during the spin cycle. A properly leveled machine should run smoothly without excessive vibration or noise.
If you still notice some shaking, double-check that the load is balanced inside the drum. Sometimes what feels like a leveling problem is actually just clothes bunched up on one side. Redistribute the load and try again.
For washers, pay special attention during the final spin cycle when the drum is moving at its fastest. This is when leveling issues become most apparent. If everything sounds good during this phase, you have nailed it.
When to Call in the Pros
Look, we are all for DIY solutions, but sometimes you need to know when to wave the white flag. If you have followed all these steps and are still experiencing significant vibration or your appliance seems to be fighting against the leveling adjustments, there might be internal issues at play.
Problems with suspension systems, worn shock absorbers, or damaged drums are beyond the scope of basic leveling and require professional attention. If you are in the Columbus area and find yourself in this situation, it might be time to contact a professional for a more thorough evaluation.
Keeping Things Level for the Long Haul
Once you have got your appliances properly leveled, a little maintenance goes a long way. Check the level every few months, especially if you have noticed any changes in performance or noise levels. Houses settle, floors shift, and even normal use can gradually affect the positioning.
Keep those locking nuts snug, but do not overtighten them. You want them secure enough to prevent movement but not so tight that you strip the threads or make future adjustments impossible.
Consider investing in anti-vibration pads, especially if you live in an apartment or have laundry facilities on an upper floor. These inexpensive additions can make a huge difference in noise transmission and provide an extra buffer against minor floor irregularities.
Columbus-Specific Considerations
Living in Central Ohio comes with its own unique challenges for appliance maintenance. Our clay-heavy soil can cause foundation settling, especially in older neighborhoods like German Village or Victorian Village. This settling can affect floor levels over time, so periodic checks are especially important for local homeowners.
If you are dealing with a basement laundry setup, which is common in Columbus homes, pay extra attention to humidity levels. High moisture can cause wooden floors to expand and contract, potentially affecting your leveling work over time.
For those in newer subdivisions around Dublin or Westerville, your floors are probably more level to begin with, but do not skip the leveling process entirely. Even minor discrepancies can lead to problems over time, especially with high-efficiency machines that spin at higher speeds.
Taking the time to properly level your washer and dryer is one of those simple maintenance tasks that pays huge dividends. Your appliances will run better, last longer, and keep the peace in your home. Plus, there is something satisfying about solving a problem with your own two hands and some basic tools.
Whether you are setting up a new laundry room or finally addressing that annoying vibration that has been driving you crazy, these techniques will get you sorted out. And remember, if you are shopping for new washers or dryers, proper installation and leveling from day one will help you get the most out of your investment.